![[AWS] AWS CloudFormation으로 인프라 배포 자동화](https://img1.daumcdn.net/thumb/R750x0/?scode=mtistory2&fname=https%3A%2F%2Fblog.kakaocdn.net%2Fdn%2Fcw21Mm%2Fbtq9ReafqYG%2FcGO6bEpFGKrcmn1wfaKjq1%2Fimg.png)
IaC (Infrastructure as Code)란?
IaC(Infrastructure as Code)란 Code로 인프라를 구축하고 관리하며 배포하는 것을 의미한다.
Code 기반으로 인프라를 제어하고 관리한다는 것은 수많은 이점을 가진다.
우선 반복되는 인프라 작업을 자동화시킬 수 있다. 자연스럽게 작업시간이 단축되며, 사람이 수동으로 작업하며 발생할 수 있는 휴먼에러를 최소화할 수 있다.
또한 인프라 구성사항 및 작업내용을 문서화할 수 있다. 인프라의 일관성을 향상시킬 수 있으며, 버전을 관리할 수 있게 된다. 버전관리는 IaC의 큰 장점 중 하나이다.
당연히 이 모든 것은 비용절감으로 이어진다.
IaC는 DevOps 개념에서 아주 중요한 부분이다.
운영자가 하던 인프라 작업의 대부분을 code로 처리할 수 있게 되며 개발과 운영의 경계가 옅어지고 있다. 인프라 관리를 위한 code와 애플리케이션 실행을 위한 code의 경계도 좁아지고 있으며, 인프라 프로비저닝과 애플리케이션 배포를 동시에 할 수 있다.
이미 DevOps는 충분히 수면위로 떠올랐으며, IaC 또한 더 이상 새로운 기술이 아니다.
개인적으로는 멀지 않은 미래에 대부분의 인프라 관리와 작업이 code 기반으로 완전하게 전환될 것이라고 생각한다. (즉, Operator 직무도 개발을 기본으로 해야 한다는 이야기... 반대로 말하면 개발자도 인프라를 알아야 한다는 이야기...)
IaC 툴에는 대표적으로 Terraform, Chef, Ansible, Puppet, AWS CloudFormation 등이 있다.
오늘 포스팅에서는 AWS CloudFormation을 통해 AWS 인프라를 자동으로 배포하는 방법에 대해 알아보자.
참고로 AWS CloudFormation은 무료이다. (AWS::*, Alexa::*, Custom::*과 같은 네임스페이스의 리소스 공급자에서 사용하는 경우)
만약 외부의 리소스 공급자를 사용하는 경우 핸들러 작업 당 요금이 부과된다. (참고 : https://aws.amazon.com/cloudformation/pricing/)
AWS CloudFormation 동작 원리
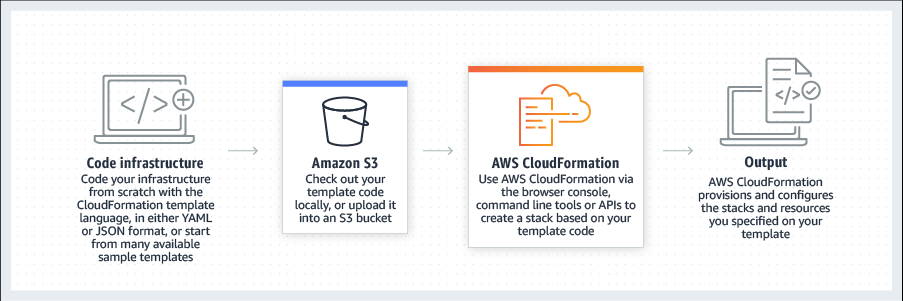
1. template 작성
JSON/YAML 코드로 템플릿을 작성한다. .json, .yaml, .template, .txt 등 모든 확장명으로 파일을 저장할 수 있다.
템플릿은 5가지 유형의 요소로 구성된다.
- 템플릿 파라미터의 선택적 목록(스택 생성 시 입력 값이 제공됨)
- 출력 값의 선택적 목록(예: 웹 애플리케이션에 대한 전체 URL)
- 정적 구성 값을 조회하는 데 사용되는 데이터 테이블의 선택적 목록(예: AMI 이름)
- AWS 리소스 및 해당 구성 값 목록
- 템플릿 파일 형식 버전 번호
2. template 업로드
작성한 템플릿을 local 또는 S3 버킷에 저장하여 업로드한다.
3. stack 생성
Cloudformation은 스택이라는 하나의 단위로 관련 리소스를 관리한다.
스택의 모든 리소스는 템플릿으로 정의되며, Cloudformation은 템플릿 코드를 읽어 스택을 생성한다.
만약 템플릿에 파라미터가 포함된 경우 스택을 생성할 때 입력 값을 지정할 수 있다.
4. stack 설정 및 resource 생성
3단계와 4단계의 구분은 사실 의미가 없긴 하다.
템플릿에 정의된 리소스가 생성된 후 CloudFormation은 유저에게 스택이 생성되었다고 보고한다.
그러면 유저는 스택의 리소스를 사용할 수 있는 것이다.
스택의 리소스를 업데이트해야 하는 경우 스택의 템플릿을 수정하면 된다.
CloudFormation은 수정된 템플릿을 원본 템플릿과 비교하여 변경 사항을 검토하고 스택을 업데이트한다.
스택을 삭제하는 경우 기본적으로 해당 스택과 스택 내 모든 리소스를 삭제하지만, 일부 리소스를 보존하고 싶은 경우 삭제 정책을 이용할 수 있다.
AWS CloudFormation 실습 시나리오
1. network 계층 배포
network 인프라 구성을 위한 템플릿 파일은 아래와 같다.
템플릿에 대한 해석은 따로 하지 않겠다. AWS를 이용해보았다면 코드만 보아도 대충 감은 잡힐 것이다. 자세한 내역이 궁금하다면 가이드문서를 참고 바란다.
lab-network.yaml
AWSTemplateFormatVersion: 2010-09-09
Description: >-
  Network Template: Sample template that creates a VPC with DNS and public IPs enabled.

# This template creates:
#   VPC
#   Internet Gateway
#   Public Route Table
#   Public Subnet

######################
# Resources section
######################

Resources:

  ## VPC

  VPC:
    Type: AWS::EC2::VPC
    Properties:
      EnableDnsSupport: true
      EnableDnsHostnames: true
      CidrBlock: 10.0.0.0/16

  ## Internet Gateway

  InternetGateway:
    Type: AWS::EC2::InternetGateway

  VPCGatewayAttachment:
    Type: AWS::EC2::VPCGatewayAttachment
    Properties:
      VpcId: !Ref VPC
      InternetGatewayId: !Ref InternetGateway

  ## Public Route Table

  PublicRouteTable:
    Type: AWS::EC2::RouteTable
    Properties:
      VpcId: !Ref VPC

  PublicRoute:
    Type: AWS::EC2::Route
    DependsOn: VPCGatewayAttachment
    Properties:
      RouteTableId: !Ref PublicRouteTable
      DestinationCidrBlock: 0.0.0.0/0
      GatewayId: !Ref InternetGateway

  ## Public Subnet

  PublicSubnet:
    Type: AWS::EC2::Subnet
    Properties:
      VpcId: !Ref VPC
      CidrBlock: 10.0.0.0/24
      AvailabilityZone: !Select
        - 0
        - !GetAZs
          Ref: AWS::Region

  PublicSubnetRouteTableAssociation:
    Type: AWS::EC2::SubnetRouteTableAssociation
    Properties:
      SubnetId: !Ref PublicSubnet
      RouteTableId: !Ref PublicRouteTable

  PublicSubnetNetworkAclAssociation:
    Type: AWS::EC2::SubnetNetworkAclAssociation
    Properties:
      SubnetId: !Ref PublicSubnet
      NetworkAclId: !GetAtt
        - VPC
        - DefaultNetworkAcl

######################
# Outputs section
######################

Outputs:

  PublicSubnet:
    Description: The subnet ID to use for public web servers
    Value: !Ref PublicSubnet
    Export:
      Name: !Sub '${AWS::StackName}-SubnetID'

  VPC:
    Description: VPC ID
    Value: !Ref VPC
    Export:
      Name: !Sub '${AWS::StackName}-VPCID'
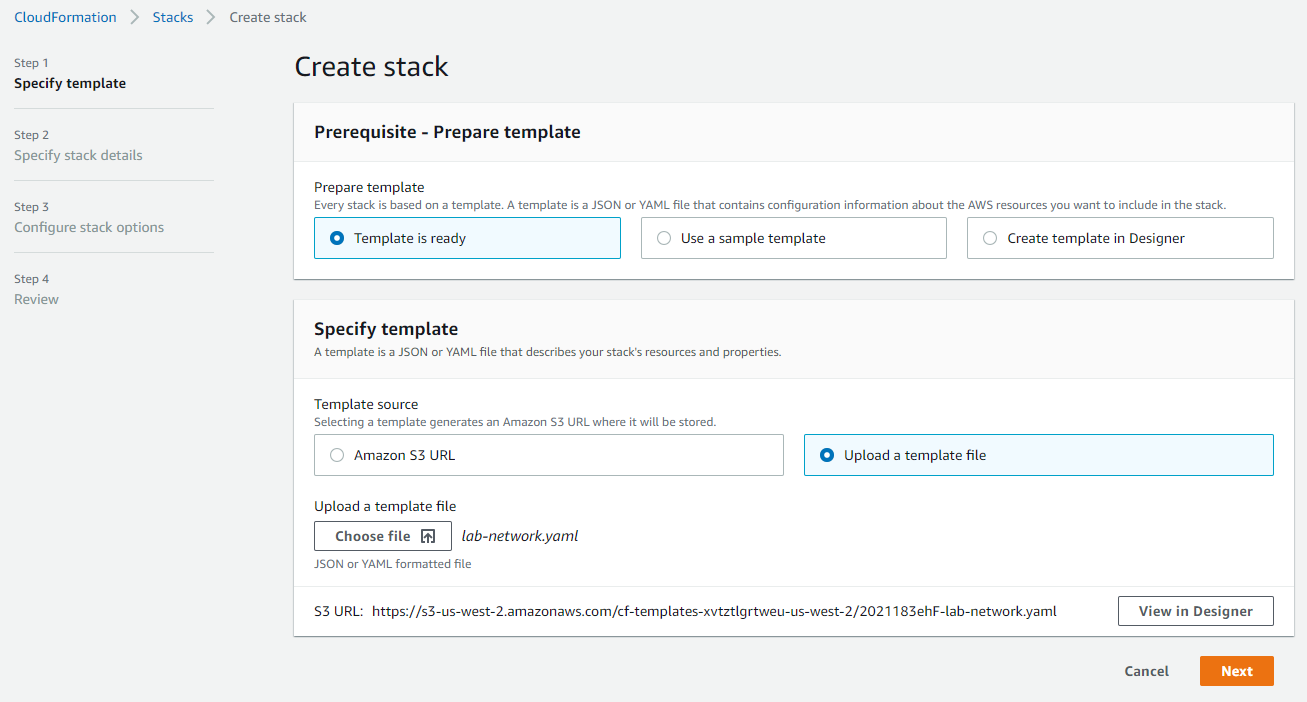
1.1 템플릿 지정
위의 템플릿 코드를 직접 업로드하였다.
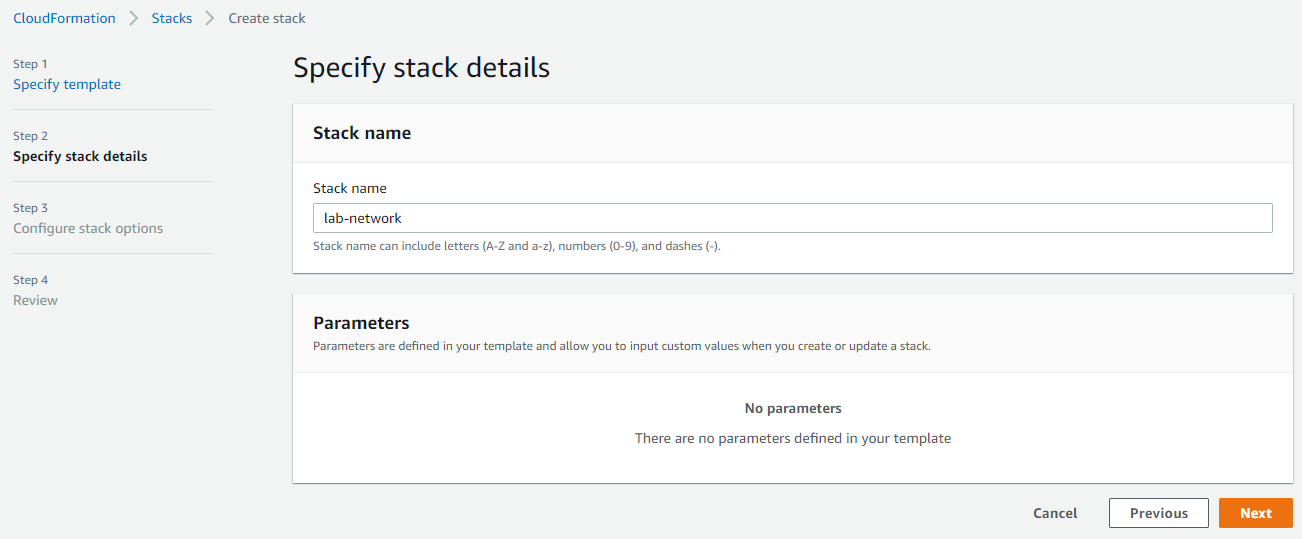
1.2 Stack 세부정보 지정
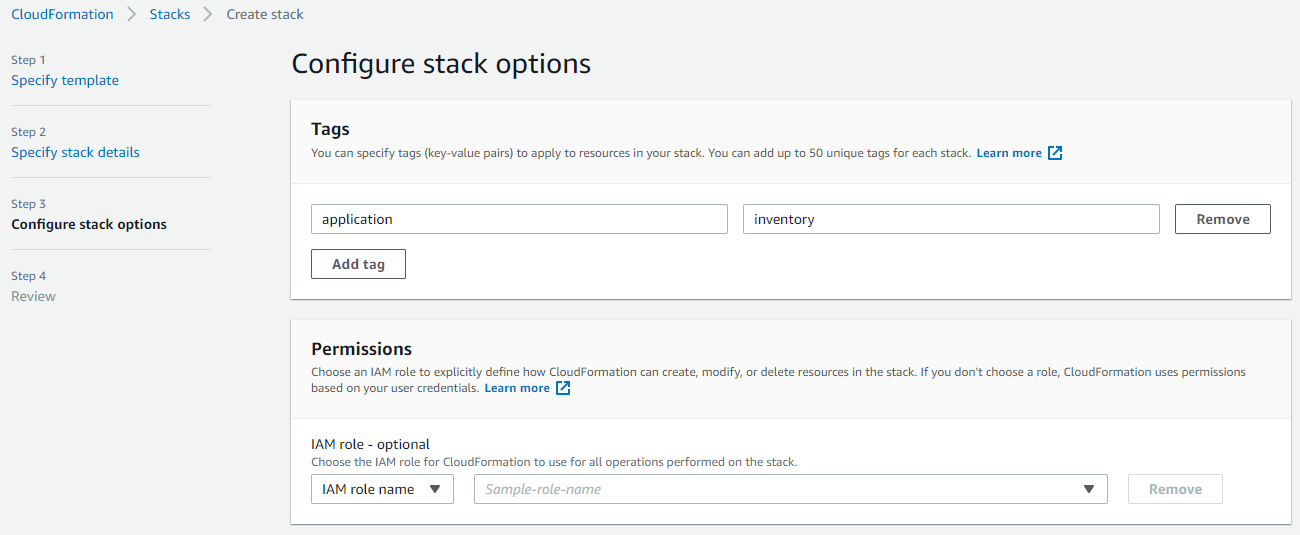
1.3 Stack 옵션 구성
1.4 Stack 생성
최종 검토 후에 스택을 생성하면 아래와 같은 화면을 볼 수 있다.
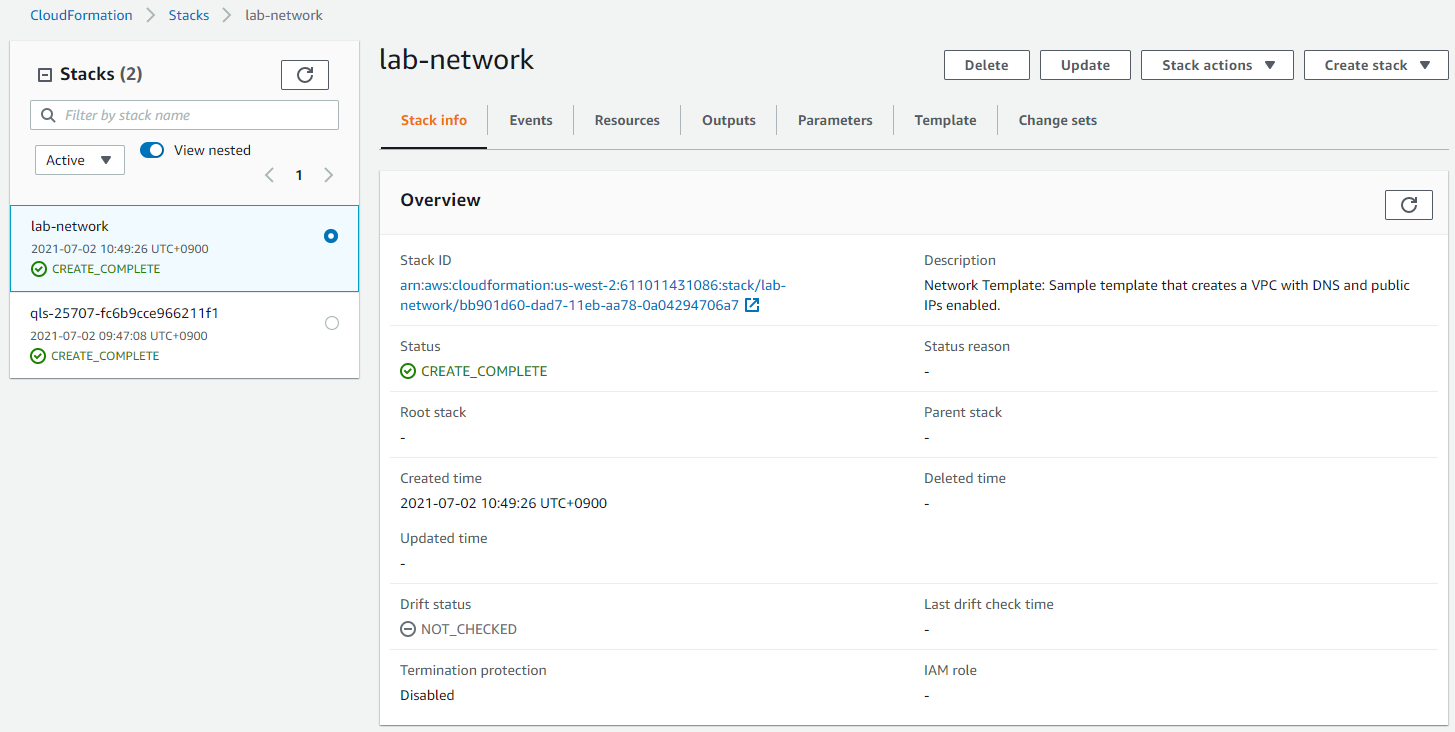
1.5 Resources 확인
템플릿에 정의한 리소스들이 정상적으로 생성되었음을 확인할 수 있다.

1.6 Events 확인
스택 또는 리소스 상태의 이벤트 또한 확인 가능하다.

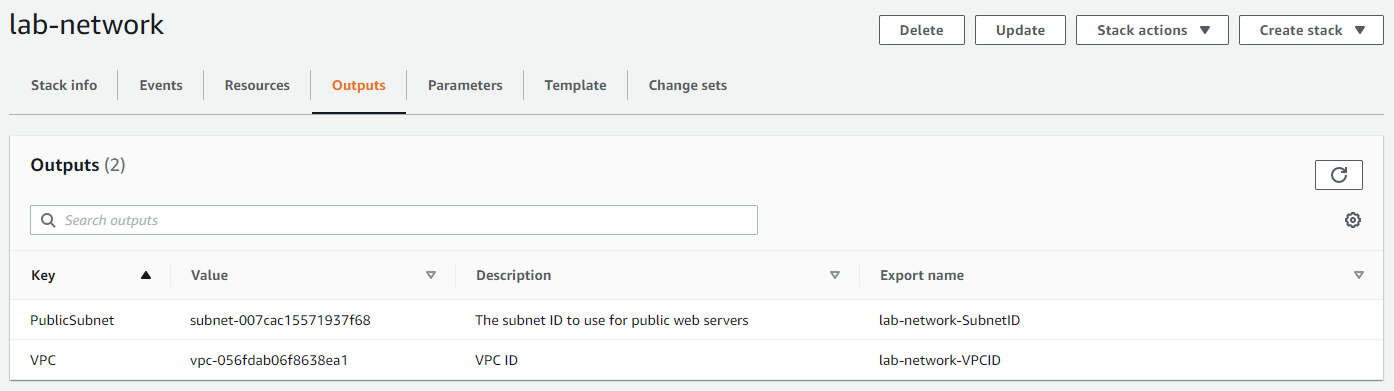
1.7 Outputs 확인
스택 간에 정보를 공유하기 위해서 스택의 Output을 설정할 수 있다.
필자의 경우 위 템플릿의 마지막 문단에서 PublicSubnet ID와 VPC ID를 Output으로 지정해놓았고, 생성된 리소스들의 ID가 정상적으로 출력되는 것을 확인할 수 있다.
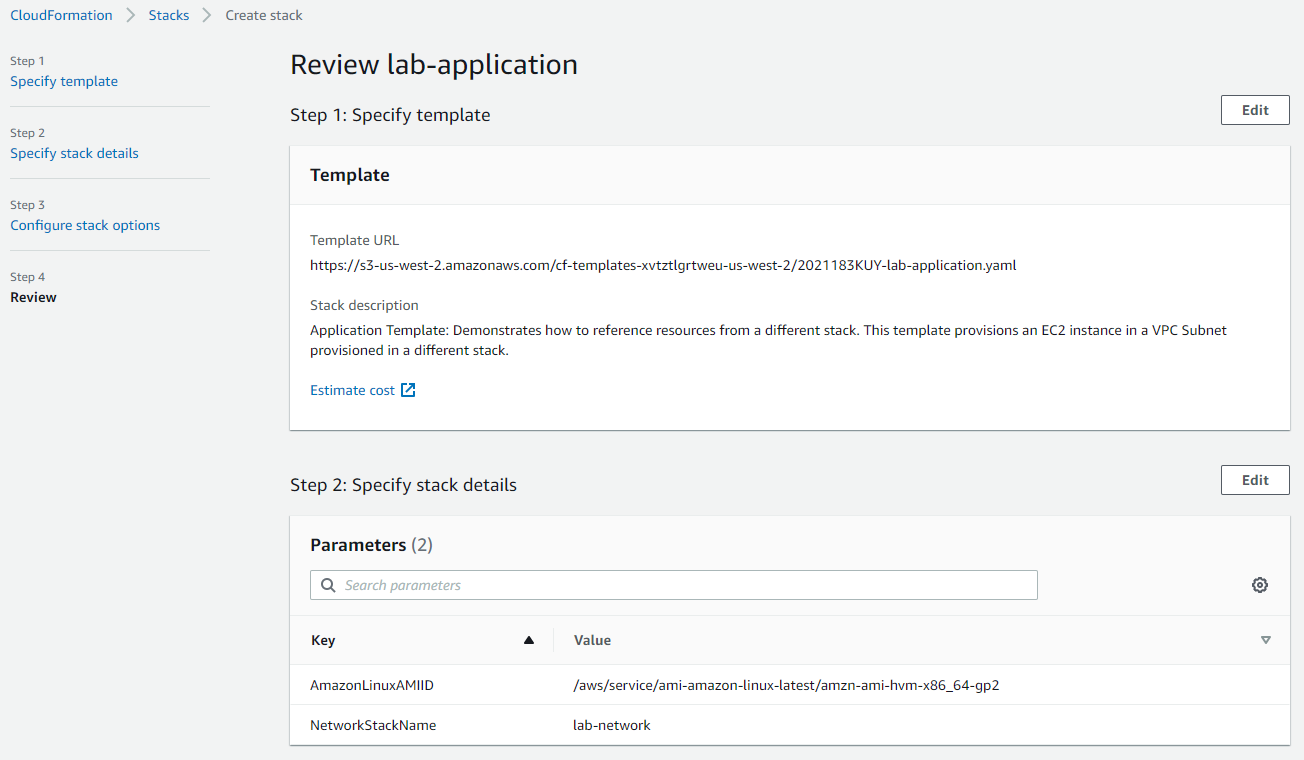
2. application 계층 배포
네트워크 구성을 완료했으니 이번에는 애플리케이션 계층을 배포할 차례이다.
lab-network 스택에서 생성한 리소스에 웹서버를 띄우기 위한 템플릿을 준비하였다.
lab-application.yaml
AWSTemplateFormatVersion: 2010-09-09
Description: >-
  Application Template: Demonstrates how to reference resources from a different stack.
  This template provisions an EC2 instance in a VPC Subnet provisioned in a different stack.

# This template creates:
#   Amazon EC2 instance
#   Security Group

######################
# Parameters section
######################

Parameters:

  NetworkStackName:
    Description: >-
      Name of an active CloudFormation stack that contains the networking
      resources, such as the VPC and subnet that will be used in this stack.
    Type: String
    MinLength: 1
    MaxLength: 255
    AllowedPattern: '^[a-zA-Z][-a-zA-Z0-9]*$'
    Default: lab-network

  AmazonLinuxAMIID:
    Type: AWS::SSM::Parameter::Value<AWS::EC2::Image::Id>
    Default: /aws/service/ami-amazon-linux-latest/amzn-ami-hvm-x86_64-gp2

######################
# Resources section
######################

Resources:

  WebServerInstance:
    Type: AWS::EC2::Instance
    Metadata:
      'AWS::CloudFormation::Init':
        configSets:
          All:
            - ConfigureSampleApp
        ConfigureSampleApp:
          packages:
            yum:
              httpd: []
          files:
            /var/www/html/index.html:
              content: |
                <img src="<https://s3.amazonaws.com/cloudformation-examples/cloudformation_graphic.png>" alt="AWS CloudFormation Logo"/>
                <h1>Congratulations, you have successfully launched the AWS CloudFormation sample.</h1>
              mode: 000644
              owner: apache
              group: apache
          services:
            sysvinit:
              httpd:
                enabled: true
                ensureRunning: true
    Properties:
      InstanceType: t2.micro
      ImageId: !Ref AmazonLinuxAMIID
      NetworkInterfaces:
        - GroupSet:
            - !Ref WebServerSecurityGroup
          AssociatePublicIpAddress: true
          DeviceIndex: 0
          DeleteOnTermination: true
          SubnetId:
            Fn::ImportValue:
              !Sub ${NetworkStackName}-SubnetID
      Tags:
        - Key: Name
          Value: Web Server
      UserData:
        Fn::Base64: !Sub |
          #!/bin/bash -xe
          yum update -y aws-cfn-bootstrap
          # Install the files and packages from the metadata
          /opt/aws/bin/cfn-init -v --stack ${AWS::StackName} --resource WebServerInstance --configsets All --region ${AWS::Region}
          # Signal the status from cfn-init
          /opt/aws/bin/cfn-signal -e $? --stack ${AWS::StackName} --resource WebServerInstance --region ${AWS::Region}
    CreationPolicy:
      ResourceSignal:
        Timeout: PT5M

  DiskVolume:
    Type: AWS::EC2::Volume
    Properties:
      Size: 100
      AvailabilityZone: !GetAtt WebServerInstance.AvailabilityZone
      Tags:
        - Key: Name
          Value: Web Data
    DeletionPolicy: Snapshot

  DiskMountPoint:
    Type: AWS::EC2::VolumeAttachment
    Properties:
      InstanceId: !Ref WebServerInstance
      VolumeId: !Ref DiskVolume
      Device: /dev/sdh

  WebServerSecurityGroup:
    Type: AWS::EC2::SecurityGroup
    Properties:
      GroupDescription: Enable HTTP ingress
      VpcId:
        Fn::ImportValue:
          !Sub ${NetworkStackName}-VPCID
      SecurityGroupIngress:
        - IpProtocol: tcp
          FromPort: 80
          ToPort: 80
          CidrIp: 0.0.0.0/0
      Tags:
        - Key: Name
          Value: Web Server Security Group

######################
# Outputs section
######################

Outputs:
  URL:
    Description: URL of the sample website
    Value: !Sub '<http://$>{WebServerInstance.PublicDnsName}'
2.1 stack 생성
위에서 한번 해본 과정이랑 동일하기 때문에 빠르게 넘어가자.

다른 것이 있다면 parameter에 lab-network를 지정해야 한다.
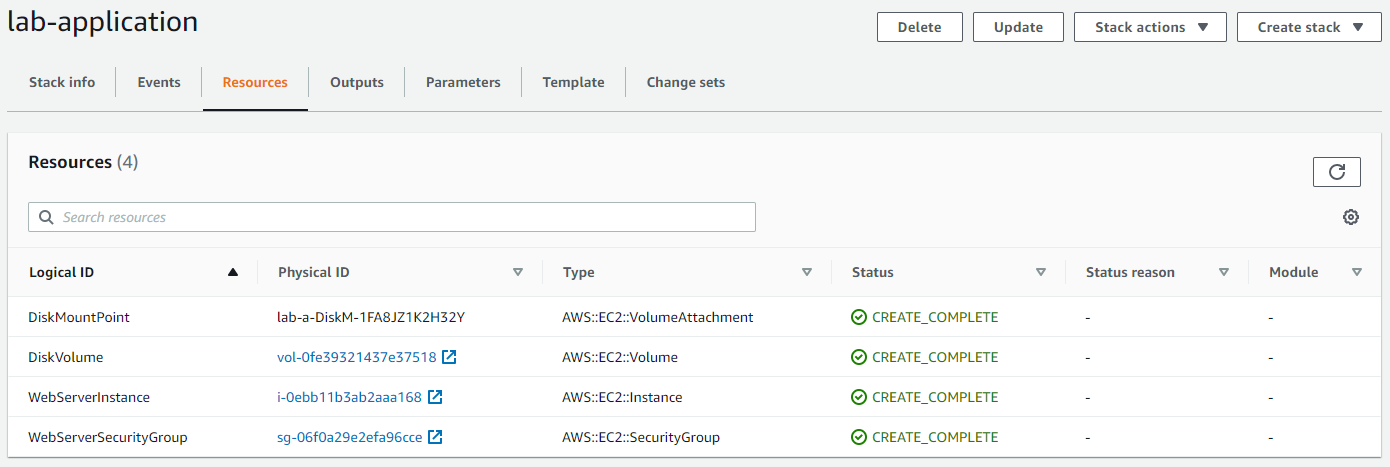
2.2 Resources 확인
템플릿에 정의한 대로 EC2 인스턴스, 보안그룹, 디스크볼륨이 정상적으로 생성된 것을 확인할 수 있다.
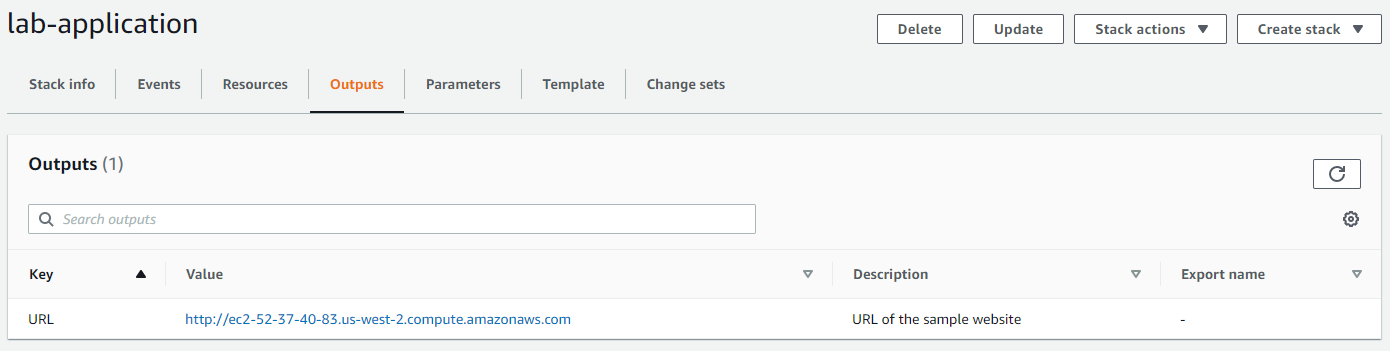
2.3 Outputs 확인
이번엔 웹서버를 띄웠기 때문에 외부에서 http(80)로 접속할 수 있도록 인스턴스의 PublicDnsName을 출력하였다.
2.4 Access 확인

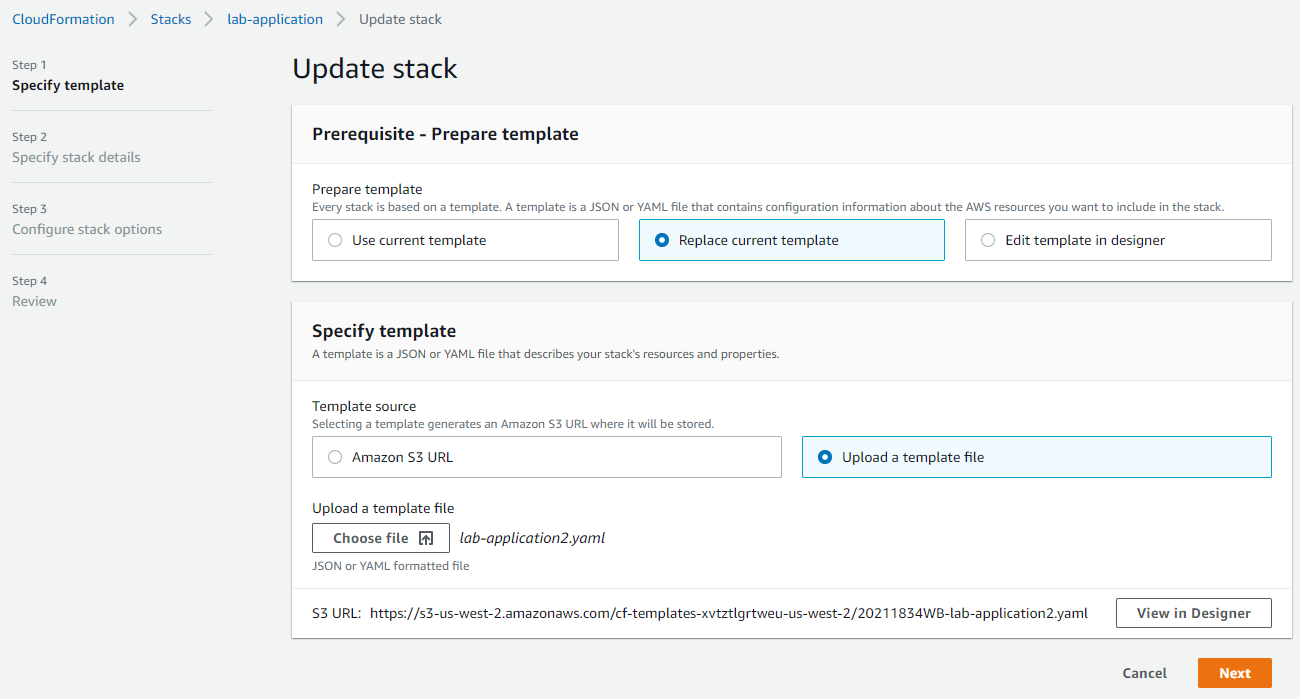
3. Stack update
이번에는 lab-application 스택을 업데이트하여 리소스가 변경되는 것을 테스트해보자.
기존 템플릿에서 파일 contents를 변경하고 보안그룹에 인바운드 SSH 트래픽을 허용하도록 하는 코드를 추가하였다.
lab-application2.yaml
AWSTemplateFormatVersion: 2010-09-09
Description: >-
  Application Template: Demonstrates how to reference resources from a different stack.
  This template provisions an EC2 instance in a VPC Subnet provisioned in a different stack.

# This template creates:
#   Amazon EC2 instance
#   Security Group

######################
# Parameters section
######################

Parameters:

  NetworkStackName:
    Description: >-
      Name of an active CloudFormation stack that contains the networking
      resources, such as the VPC and subnet that will be used in this stack.
    Type: String
    MinLength: 1
    MaxLength: 255
    AllowedPattern: '^[a-zA-Z][-a-zA-Z0-9]*$'
    Default: lab-network

  AmazonLinuxAMIID:
    Type: AWS::SSM::Parameter::Value<AWS::EC2::Image::Id>
    Default: /aws/service/ami-amazon-linux-latest/amzn-ami-hvm-x86_64-gp2

######################
# Resources section
######################

Resources:

  WebServerInstance:
    Type: AWS::EC2::Instance
    Metadata:
      'AWS::CloudFormation::Init':
        configSets:
          All:
            - ConfigureSampleApp
        ConfigureSampleApp:
          packages:
            yum:
              httpd: []
          files:
            /var/www/html/index.html:
              content: |
                <img src="<https://s3.amazonaws.com/cloudformation-examples/cloudformation_graphic.png>" alt="AWS CloudFormation Logo"/>
                <h1>Congratulations, you have successfully launched the AWS CloudFormation sample.</h1>
                <h3>Update Stack Test - by Suyeon<h3>
              mode: 000644
              owner: apache
              group: apache
          services:
            sysvinit:
              httpd:
                enabled: true
                ensureRunning: true
    Properties:
      InstanceType: t2.micro
      ImageId: !Ref AmazonLinuxAMIID
      NetworkInterfaces:
        - GroupSet:
            - !Ref WebServerSecurityGroup
          AssociatePublicIpAddress: true
          DeviceIndex: 0
          DeleteOnTermination: true
          SubnetId:
            Fn::ImportValue:
              !Sub ${NetworkStackName}-SubnetID
      Tags:
        - Key: Name
          Value: Web Server
      UserData:
        Fn::Base64: !Sub |
          #!/bin/bash -xe
          yum update -y aws-cfn-bootstrap
          # Install the files and packages from the metadata
          /opt/aws/bin/cfn-init -v --stack ${AWS::StackName} --resource WebServerInstance --configsets All --region ${AWS::Region}
          # Signal the status from cfn-init
          /opt/aws/bin/cfn-signal -e $? --stack ${AWS::StackName} --resource WebServerInstance --region ${AWS::Region}
    CreationPolicy:
      ResourceSignal:
        Timeout: PT5M

  DiskVolume:
    Type: AWS::EC2::Volume
    Properties:
      Size: 100
      AvailabilityZone: !GetAtt WebServerInstance.AvailabilityZone
      Tags:
        - Key: Name
          Value: Web Data
    DeletionPolicy: Snapshot

  DiskMountPoint:
    Type: AWS::EC2::VolumeAttachment
    Properties:
      InstanceId: !Ref WebServerInstance
      VolumeId: !Ref DiskVolume
      Device: /dev/sdh

  WebServerSecurityGroup:
    Type: AWS::EC2::SecurityGroup
    Properties:
      GroupDescription: Enable HTTP ingress
      VpcId:
        Fn::ImportValue:
          !Sub ${NetworkStackName}-VPCID
      SecurityGroupIngress:
        - IpProtocol: tcp
          FromPort: 80
          ToPort: 80
          CidrIp: 0.0.0.0/0
        - IpProtocol: tcp
          FromPort: 22
          ToPort: 22
          CidrIp: 0.0.0.0/0
      Tags:
        - Key: Name
          Value: Web Server Security Group

######################
# Outputs section
######################

Outputs:
  URL:
    Description: URL of the sample website
    Value: !Sub '<http://$>{WebServerInstance.PublicDnsName}'
3.1 Update Stack
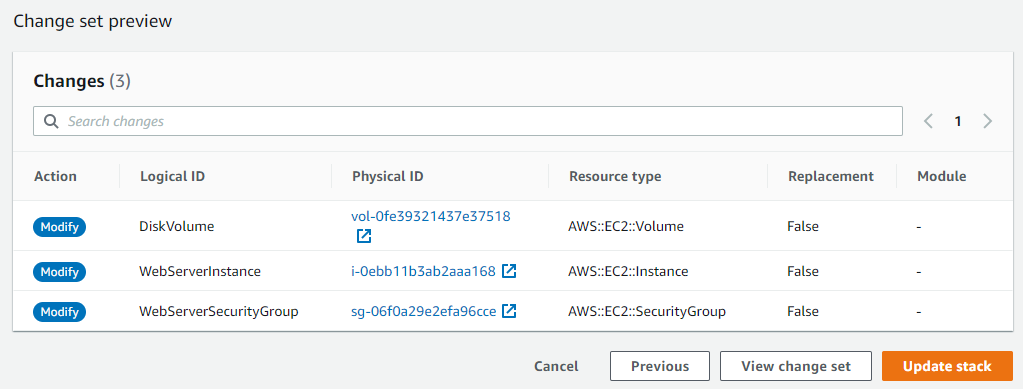
3.2 변경사항 확인
Review 단계에서 변경사항을 확인할 수 있다.
Replacement = False라는 것은 각 리소스에 최소한의 변경만 있으며, 해당 리소스에 대한 참조는 변경할 필요가 없다는 것을 의미한다.
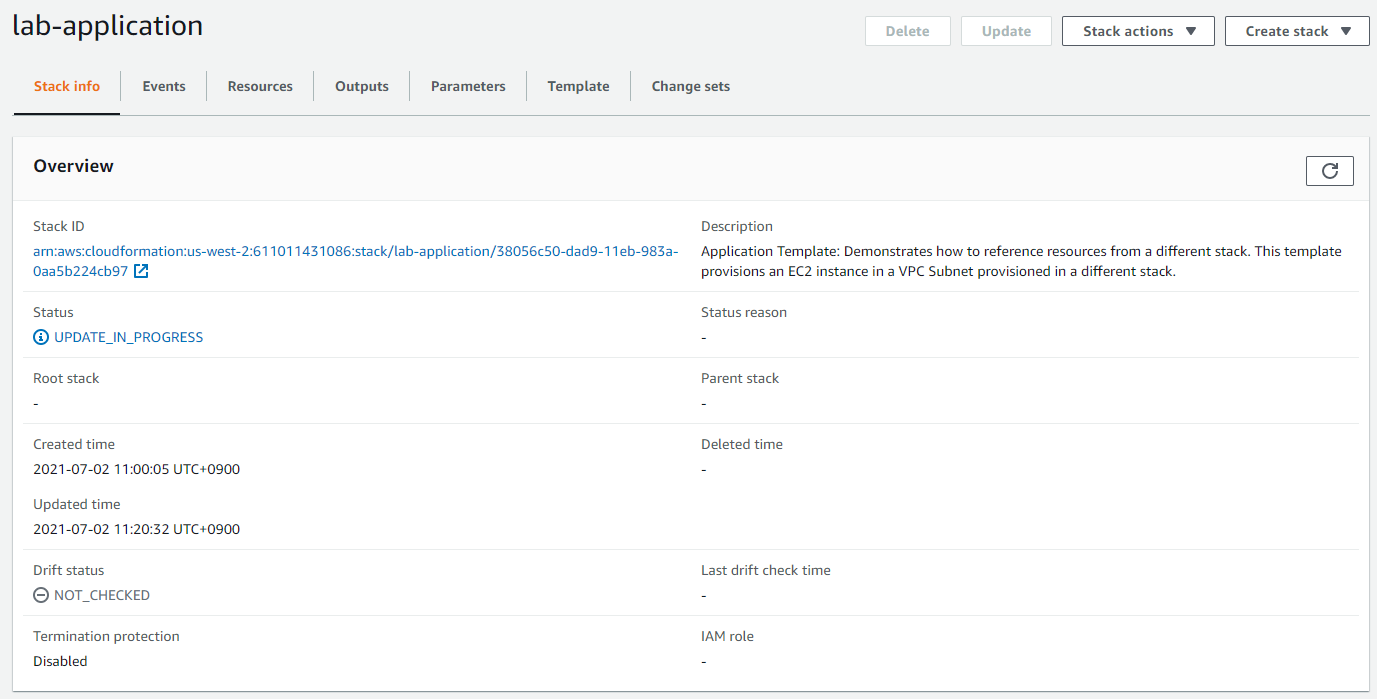
3.3 update 중...
현재 Status를 보면 update 중인 것을 확인할 수 있다.
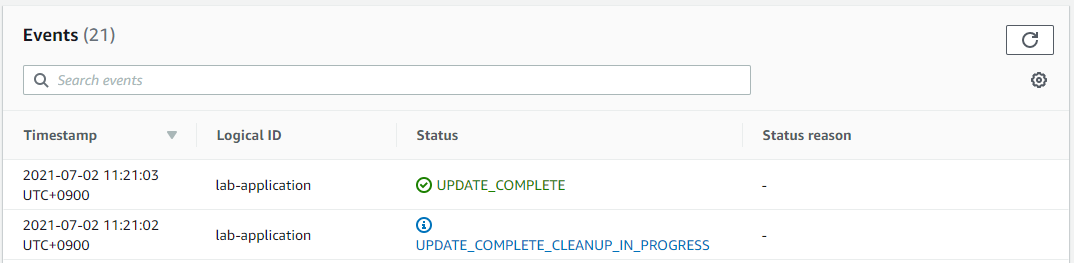
3.4 Events 확인
정상적으로 업데이트가 완료되었다.
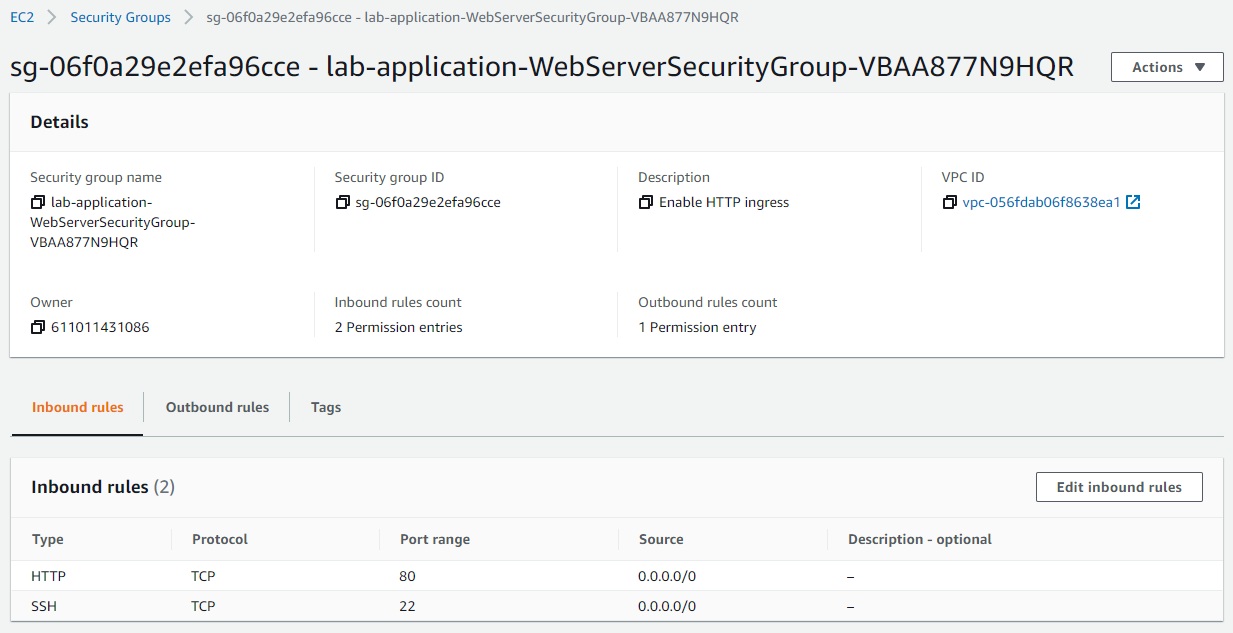
3.5 리소스 변경 확인
Security Group 대시보드에서 SSH(22) rule이 추가된 것을 확인할 수 있다.
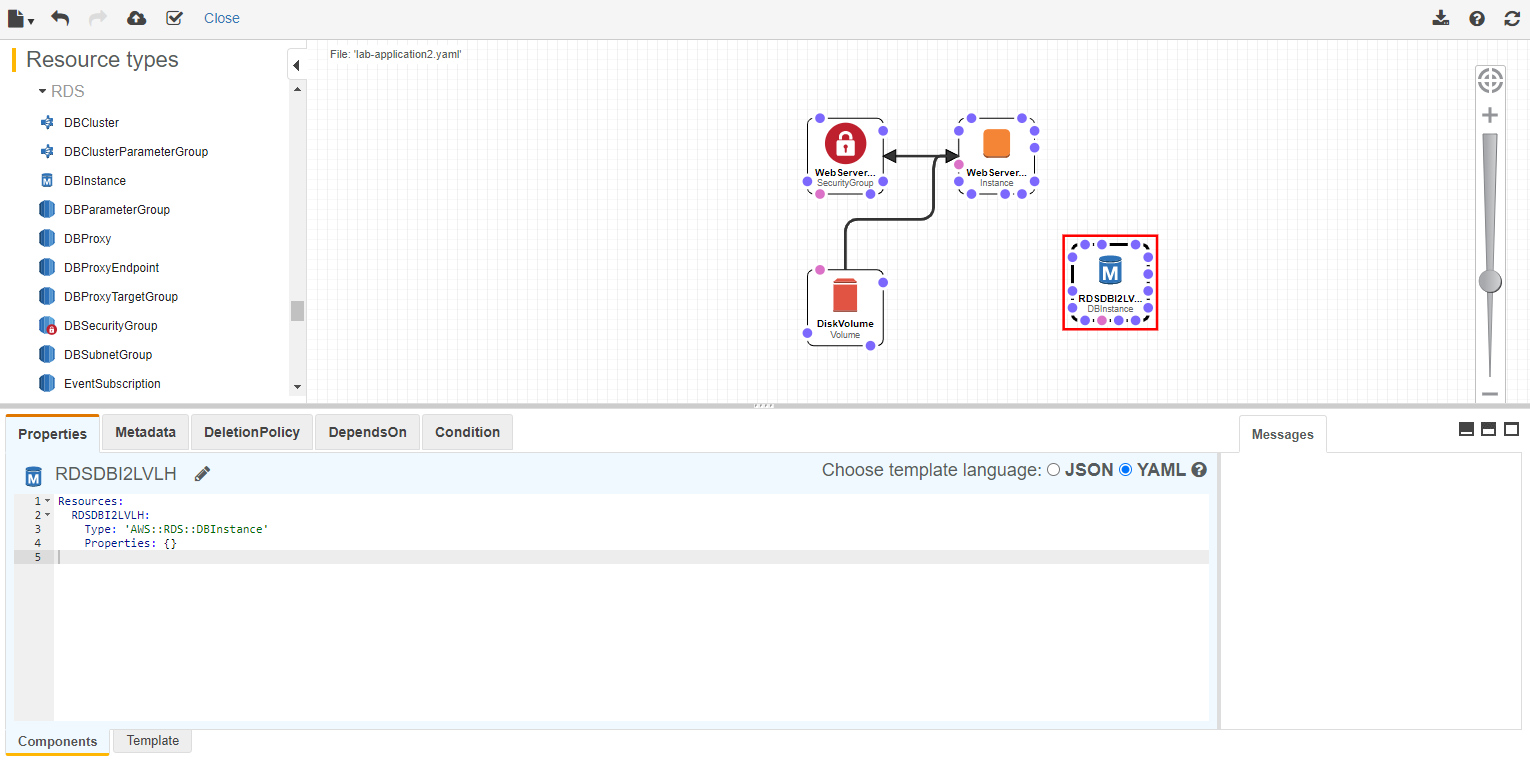
4. AWS CloudFormation Designer
CloudFormation Designer는 템플릿을 간편하게 확인하고 제어하기 위한 그래픽 기반의 도구이다.
이를 사용하면 템플릿의 리소스 간 연관성을 빠르게 파악하고 쉽게 수정할 수 있다.
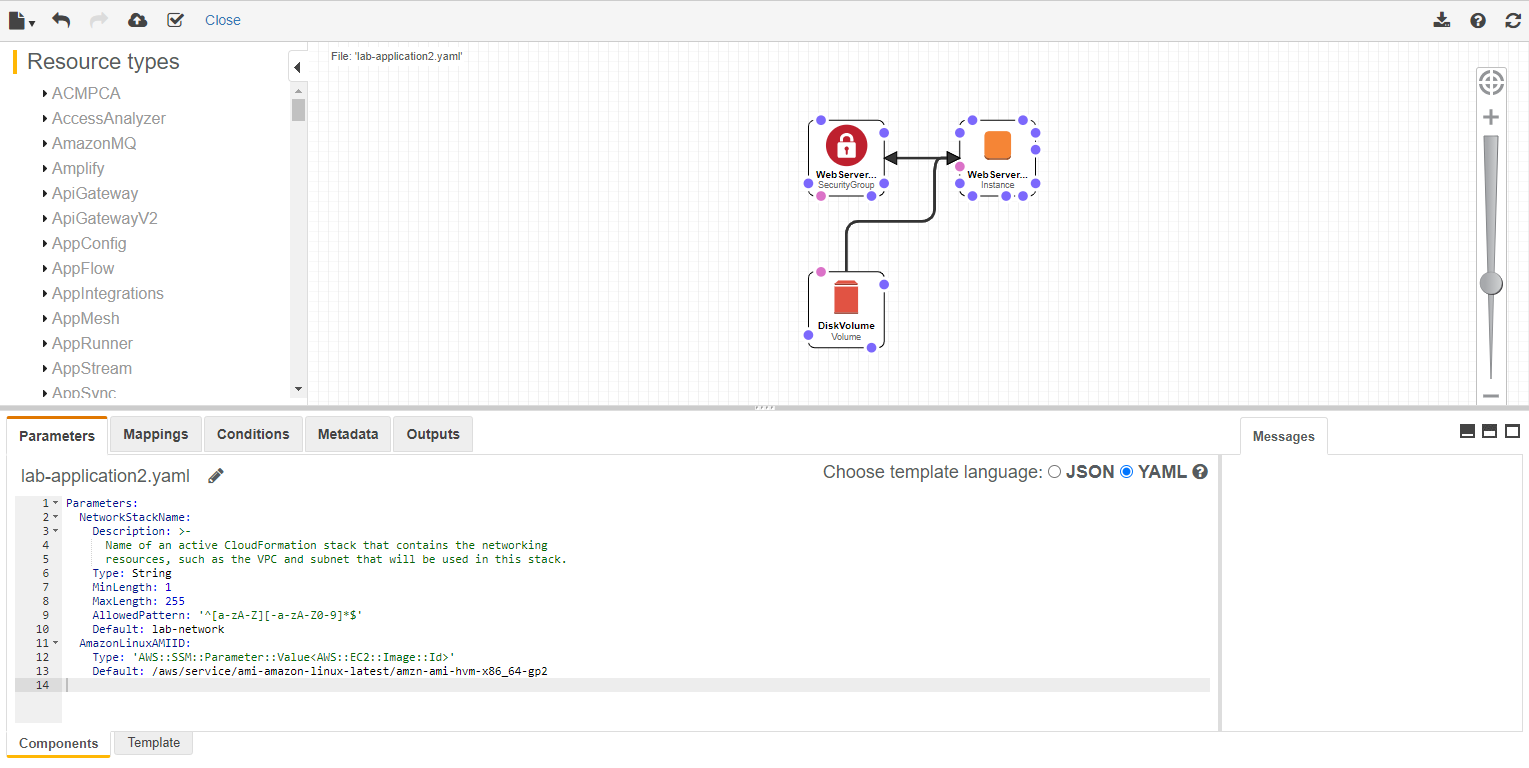
이런 식으로 리소스를 끌어서 템플릿에 자동으로 삽입하고, 리소스 간 관계를 만들 수도 있다.
5. Stack 삭제
5.1 Delete Stack
생성한 Stack을 삭제할 차례이다.

5.2 Events 확인
Events를 보면 스택의 리소스들이 삭제되는 것을 확인할 수 있다.

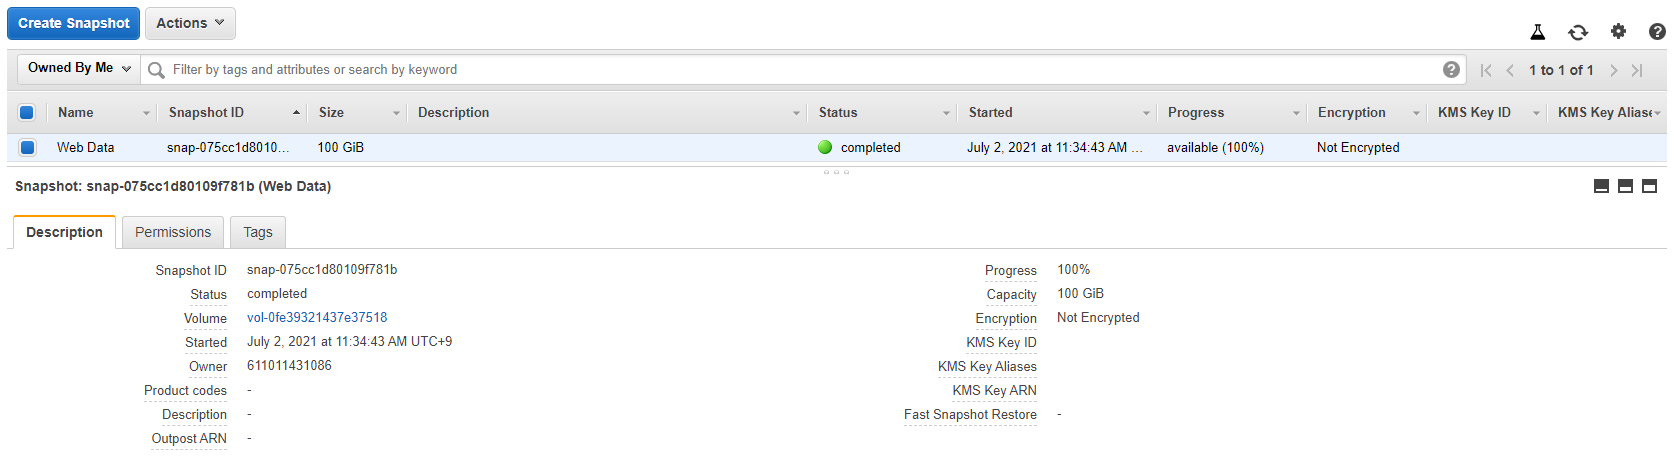
5.3 DeletionPolicy
삭제 정책을 이용하면 스택이 삭제될 때 리소스를 보존하거나 백업할 수 있다.
DeletionPolicy 속성
Retain옵션을 지정하면 스택 삭제 시 리소스가 유지된다.Snapshot옵션을 지정하면 해당 리소스를 삭제하기 전에 리소스의 스냅샷을 생성한다.Delete옵션을 지정하면 스택과 함께 리소스가 삭제된다.
Snapshot 옵션을 선택한 경우 아래와 같이 DataVolume에 대한 스냅샷이 생성된 것을 확인할 수 있다.